|
|
|
The rest of this page contains
information on the different parts of ExtractNow.
|
|
General |
| 1. Shows the
List of Files to Extract. All files listed here will be extracted.
Dragging files or folders from explorer and onto this window will add
them to the list of files to extract. Note : In a multi-volume archive only the first file needs to be dropped. |
| 2. Switches between
the File View and the History View |
| 3. Opens an e-mail
to the author of the program |
| 4. Open a Web
Browser that goes to the ExtractNow website |
| 5. Shows the
Settings Window where you can change all program settings |
| 6. Removes the
selected files from the List of Files to Extract control. Does not
physically remove them from your hard-drive |
| 7.
Extracts all the files in the List of Files to Extract control |
| 8. Shows the
extraction progress of all the files in the archive that is currently being
worked on |
| 9. Shows the
extraction progress of all the files that were in he List of Files to
Extract control |
| 10. Basically this
is a status bar, that is used in History View |
| 11. Stops
extraction the process in the middle of its tracks! |
|
|
Add Files
Adds
files to the List of Files To Extract |
Search Through Folder
For Files
Allows the user to select a folder which is then searched
for archives which are added to the List of Files To Extract |
Clear All Files
Clears all the files from the List of Files To Extract, this does NOT
delete the files from the hard disk |
Large Icons, Details,
List, & Small Icons
Changes the view
of icons in the List of Files To Extract |
|
Main Window - History View
|
|
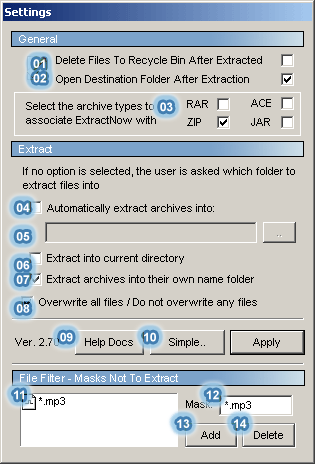
Allows you to change the
program's extraction settings |
|
General |
| 1. After extraction
is complete, if checked, extracted files will be deleted to the Recycling
Bin |
| 2. Opens the
folder archives were extracted to once extraction is complete |
|
File
Association |
| 3. Associates
ExtractNow with these specific file types. |
|
Extraction &
Favorite Folder |
| 4. If this option
is selected, all files that are extracted will be extracted to the path
selected. |
| 5. Enabled if the
Automatically Archives into Folder option is selected. Shows the
path to extract the archives to |
| 6. Will extract
files from each archive to the location where the archive is.
c:\windows\x.zip extracts into ->
c:\windows\ |
| != 5 || 6. If
neither option 4 or 5 is chosen, then the user is asked which folder to
extract the selected files into. More.. |
| 7. Extracts each
archive into their own folder.
c:\windows\x.zip extracts into ->
c:\windows\x\ |
| 8. Gives the option
to or not to automatically overwrite existing files when extracting
archives. Checked = overwrite files, Unchecked = do not overwrite files |
|
File
Masking - Masks Not to Extract |
| Allows you to weed out any
unwanted types of files. If for example you did not want to extract ANY
files with the word 'sex' in their file names, you just add the mask, "sex"
or "*sex*" (which are treated the same), to the List of Masks not to
Extract |
| 10. Shows the
List of Masks not to Extract |
| 11.
Where masks are entered |
| 12. Adds the
entered mask into the List of Masks not to Extract |
| 13. Deletes the
selected masks from the List of Masks not to Extract |
|
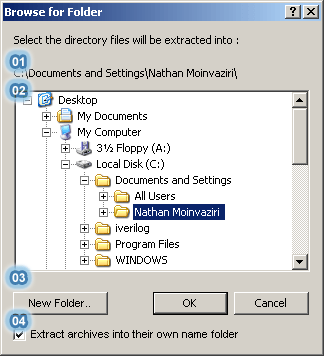
Selects a folder for extraction
of archived contents into |
|
General |
| 1. Shows the full
path of the directory selected in the Directory Tree |
| 2. Directory
Tree that shows the hierarchy of the file system on the installed
computer. |
| 3. Allows the
creation of a specified folder under the directory selected in the
Directory Tree (See Create New Folder Window) |
| 4. Extract
Archives into their own Name Folder option (same option as the one in
the Settings Window). If selected, then it will
apply for all archives extracted.
c:\windows\x.zip is the archive name and if Ok were pressed then it
would extract the contents of
c:\windows\x.zip into -> c:\windows\x\ |
|
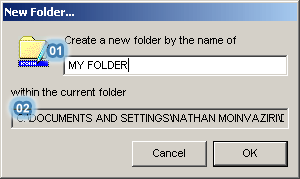
Allows the user to create a new
folder |
|
General |
| 1. Specifies the
folder name |
| 2. Directory to
create folder name in |
This example will create
the new folder of
c:\windows\my folder\ |
|
Password |
Search through folders for archives |
|
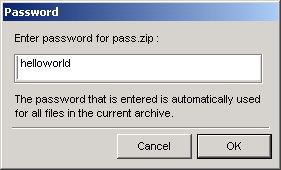
Just enter in the password for the archive. The
password entered in is automatically used for all files in the archive. |
|
|

Allows the user to search through
folders for archives. Just drag a folder onto the List of Archives to
Extract window and it will automatically be searched for archives
and any that are found will be added to the List of Archives to
Extract |
|
|
Right-Click Integration (File Association) |
(Send To -> ExtractNow)
|
|
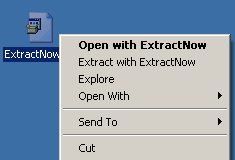
Open with ExtractNow
Opens ExtractNow with the file already added to its
list of files to extract
Extract with ExtractNow
Opens the archive in ExtractNow and automatically commences to extract
the file
|
|
|
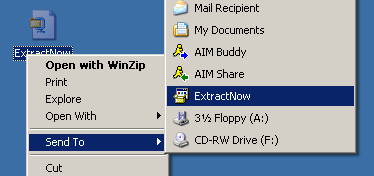
This feature is installed when ExtractNow is installed and uninstalled
when ExtractNow is uninstalled. It allows the user to open files in
ExtractNow without associating the file type with ExtractNow
necessarily. Notice the two file icons in each picture is different, but
still there is access to ExtractNow. |
|
|
System Menu |
|
|
Always On Top
Allows the user to check the internet to find out what
the latest version of ExtractNow is
Check For Latest Version
Allows the user to check the internet to find out what
the latest version of ExtractNow is
Minimize To Tray
Allows the user to check the internet to find out what
the latest version of ExtractNow is
|
|
|
|
Limiting History Reporting |
|
|
This feature allows the user to minimize the amount of
reporting that occurs. This is helpful when extracting several thousand
archives at a time. |
|
|
|
|
